Overview
The maintenance department can communicate via mobile devices to the RDP database using the Mobile Work Order module. This module allows the maintenance staff to notify or be notified of a new work order, add time spent on work order from a job site, enter notes or comments about the work completed, change the work order status from open to closed, and enter new work orders.
Both smart phones and tablets are supported with Mobile Work Orders. Note: Smart phones will not display the work order list and the detail side by side due to screen size limitations. Tap the arrow next at the bottom right of each work order listed to view the detail.
| Mobile Work Orders on Smart Phone | Mobile Work Order on Tablet |
|---|---|

|
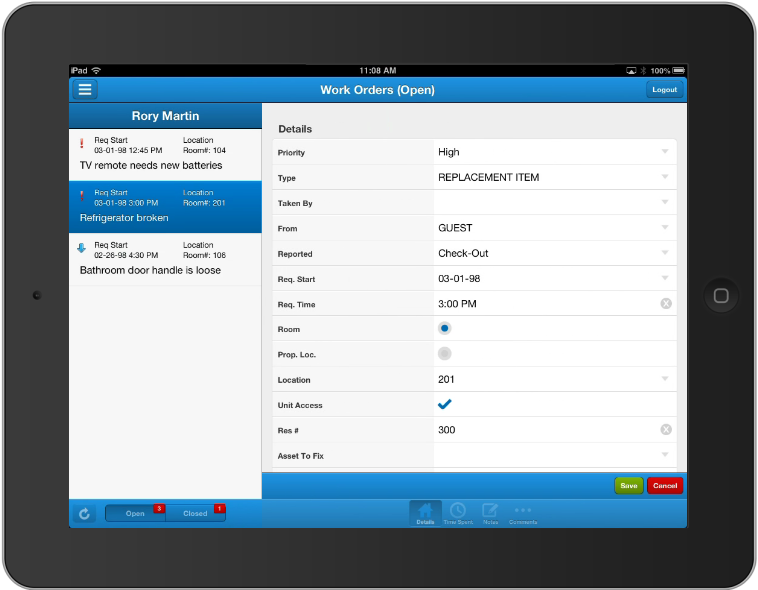
|
User Configuration
Users can be configured to see just work orders assigned to their account, or view all work orders for members of their department. To configure a user for Mobile Work Orders:
- In RDPWin, go to the System menu --> Manage Users.
- If the user exists, select it and click Change.
- If the user is not on the list, click the Add User button.
- Enter the logon name.
- If the user will access only the Mobile Work Order program and not RDPWin, check the Mobile Only box.
- Enter a password. If the user is a mobile only user, the password does not need to be a complex password (between 7 -15 characters, with at least one upper case letter, one lower case letter, and one number).
- Assign the Initials and Power Level.
- Select the User Group. For maintenance staff members, select Maintenance. If the user is the Maintenance Manager, select that from the drop down. Maintenance users will only see work orders assigned to their account. The maintenance manager will see all maintenance employees work orders. All users will work orders with the New status.
- Enter the full name, Email address, and comments if applicable.
- Select the Contact from the drop down. If it does not exist, click the Add button. The contact attaches the user to a work order vendor.
- Select any other applicable settings before clicking Save & Close.
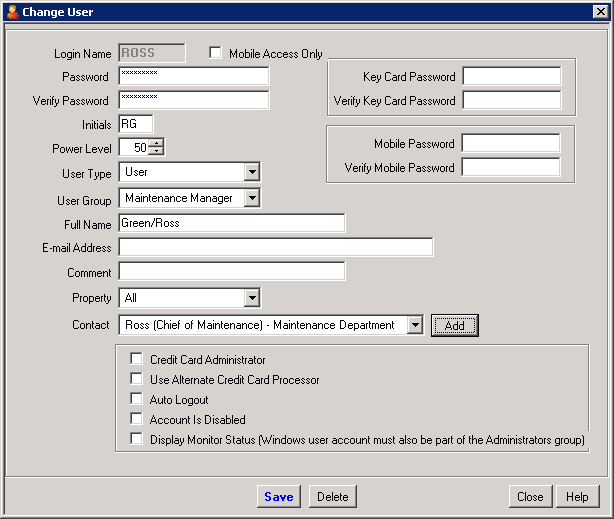
Note: A logon may be created for outside vendors in order for them to access the Mobile Work Orders.
Device Configuration
To access the mobile programs on a mobile device, open the mobile browser. Icons can be created on the mobile device pointing directly to the page. Each mobile device has different steps for creating icons on the home screen. See the mobile device's manual for instructions. The URL to access the mobile work orders is:
http://<domain name>/RDP/Mobile/WK/index.htm
Logon
The logon on screen requires the user to select the Resort by tapping in the field and selecting the correct resort. The user must enter their logon name and password.

Navigation
Below is a list of icons in the mobile program and their functions.
|
Menu- Tap this icon to view options such as Add Work Order or Close Work Order
|
Detail - Tap the arrow icon to view the detail of the work order (this option icon only displays on smart phones
|
Refresh - Tap the icon to refresh the screen
|
|
Badge Icons
|
||


Add Work Order
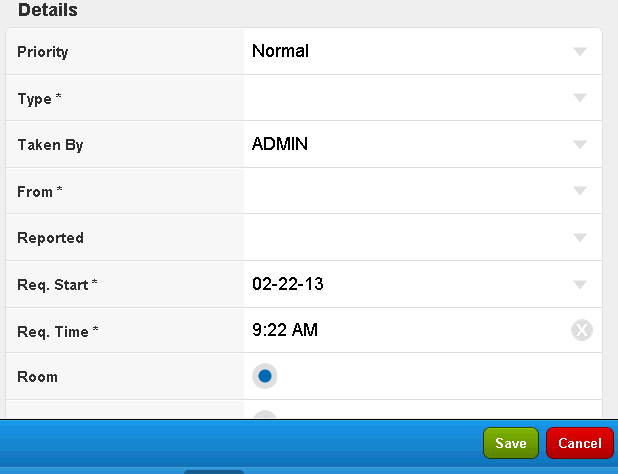
To add a work order, tap the menu icon and tap Add Work Order. Tap the field to select from the drop down or enter text. Fields with an '*' are required. Not all fields my visible, so scroll using your finger to access all fields. Once complete, click Save.
Close Work Order
Tap the work order from the list, tap the menu icon, and tap Close Work Order. Enter any time spent or additional notes or comments by clicking the badge.
Assign Work Order
Tap the work order from the list, tape the Change button. Tap the Assigned field and select the vendor. Click the Save button. The user will see the work order assigned them once they refresh the screen.
Click these links for Frequently Asked Questions or Troubleshooting assistance.
02/22/2013
© 1983-2012 Resort Data Processing Inc. All rights reserved.