Overview
RDP now has an integrated credit card payment security system called RDPPay, built directly into the Win5 products.
RDPPay can be accessed from the RDPPay Portal or Credit Card Analysis.
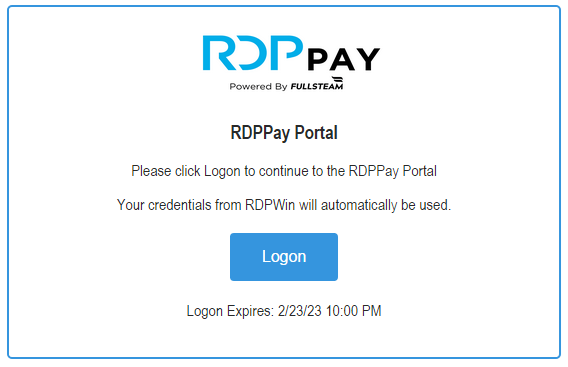
RDPPay Portal
- System | RDPPay Portal
- The primary use of RDPPay Portal is to activate credit card terminals. Access to the portal should be limited to system administrators.
- RDPPay Portal utilizes ‘Single Sign On’. This allows the RDPWin credentials to be used automatically for the RDPPay Portal logon. The first access to the portal will create a new account using the login and password from RDPWin. Subsequent accesses will use that same account on the portal.
- When clicking Logon, RDPPay obtains an access token using the merchant ID. This is a validation process to make sure the portal is secure.
- The logon screen displays when this access token will expire.
-
RDPPay Portal Dashboard
- Once in the portal, there are various options for reporting, reversing transactions, and managing credit card terminals. Using the reverse transaction operations only affects the RDPPay side and does not change payments on the guest folio or master transaction list.
-
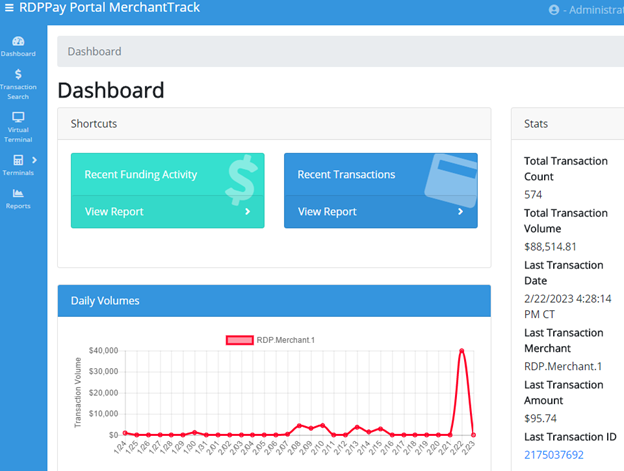
- To end the session, either click on the name in the upper right and select log out or click X to close the form. The logout option will display the RDP marketing website. Closing the form returns the user to RDPWin.
Credit Card Analysis
- Night Audit/Day End | Credit Card Analysis
- Credit card analysis accesses the RDPPay side of the payment process. This is the database on the other side of the gateway through which credit cards are processed. RDPWin also stores a credit card transaction on the folio or master in the RDP database.
- Credit card analysis should be used as the primary source for reporting, researching and reconciling credit card activity.
- There are 6 standard tabs listed below. The 7th tab, ACH Returns, is optional (Switch 428-01) and will be available by the end of 2023.

Transactions Tab
The transaction tabs will show the individual payments applied to guests, groups, owners and travel agents. The transactions can be fetched in various ways:
-
By individual merchant ID or all merchant IDs
-
By Create, Capture or Settlement Date
-
By Date Range
-
By Payment Status
-
By specific Transaction ID
-
By the last 4 digits of the credit card
![]()
Once transactions are displayed, the RDPWin grid can be used to sort, group or filter transactions even further. Also, if the RDPPay transaction has a corresponding RDPWin payment, the Master type and Master# column will be displayed. The Master# column has buttons that will display the details screen for that master in RDPWin. This functionality is the same in other tabs as well.
Selecting any transaction in the grid will complete the detail at the bottom. The left panel is the detail from RDPPay and the right panel is the detail from the RDPWin payment on the master. The ‘Full Details’ button on the RDPWin payment side will display the RDPWin payment detail.
![]()
Deposits Tab
Deposits are a batch of transactions for a specific day. They are collectively deposited into merchant’s (RDP customer) bank. The breakdown of the deposit is seen in each column. There are many columns, so this grid scrolls horizontally.
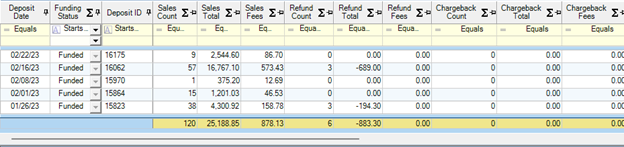
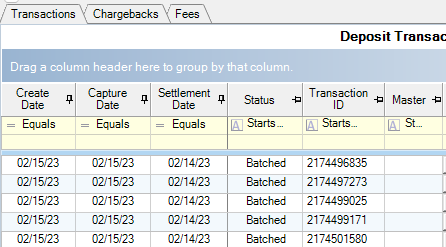
Selecting a deposit from the grid will populate the 3 detail grids (4 with ACH Returns in the future): Transactions, Chargebacks and Fees. These grids are similar to the main transaction, chargebacks and fees tabs.
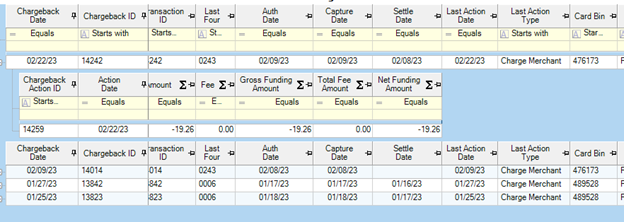
Chargebacks Tab
Chargebacks display the information when a payment transaction is disputed or refunded. Each chargeback line has a detail line for the chargeback action showing the breakdown of the payment.
Fees Tab
The Fees tab will display the breakdown of any fee for each payment transaction.
Reconcile Tab
The Reconcile tab will display each day’s total for the RDPPay transactions and the RDPWin payments. It will compare the totals and display the difference. The column in between the two totals will display a ‘< - >’ if the totals match, ‘< - - ’ if the RDPPay amount is less than the RDPWin amount or ‘- - >’ if the RDPWin amount is less than that of RDPPay.
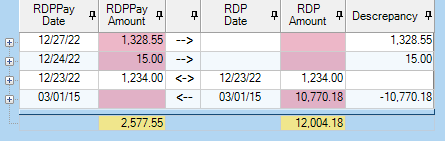
Each line can be expanded to display the transactions for the day and comparing the two amounts so any discrepancy can be seen.

This can help narrow down any issues and point to a solution. Future enhancements will display more tools to fix any issues.
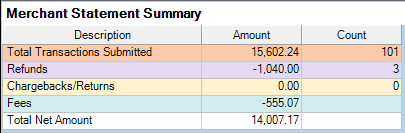
Statement Tab
A summary at the top is pinned (not scrollable), so it can be viewed as the other sections are scrolled.
Menu Security can be set which restricts access to this tab.
The other sections are:
- Transactions By Day
- Summary by Method (Card Type)
- Summary by Deposit
- Fee Summary
- Chargeback Summary
- ACH Return Summary (Future Enhancement)
After the statement is displayed, the ‘Export & Print’ button is active. This button will prompt where to save the PDF file for this statement and then will prompt to display it. To print, display the PDF and print from there.
ACH Returns Tab
Future enhancement.
Customer Setup
- Install WP Module
- Run RDPPay.upd (Configure C0 table | subrecords CCRPM1 and CCRPM2. The CCRPM1 sub-record is the primary merchant Id and is required. The CCRPM2 is optional and is used if the customer uses an alternate account to process credit cards. To add the sub-records to the customer's system you can use the RDPPay.upd. Before loading the information onto the customer’s system use the UPD maintenance utility to add the merchant values into each sub-record. When you save this information, the maintenance utility will encrypt the values.)
Configuration
- System | Configuration | RDPPay

Settings for This Workstation (#######)
These settings are for this one workstation only. The rest of the settings are system wide -- for all workstations.
Your Company Information
These settings define what information about the property prints on the credit card receipt.
- Print Company Name
- The company/property name is displayed. If this is checked, the company name is printed on the receipt. If not, only the address, without the company/property name, is printed.
- Address and Telephone
- Define what company/property contact information to print on the credit card receipt.
- Top Comment
- Defines a message from the company/property to display on the top of the receipt. For example, "Thank you for staying with us!"
- Bottom Comment
- Define a message from the company/property to display on the bottom of the receipt. For example, "Thank you for your visit. Please come again."
Interface Settings
- Allow Credit Card Authorizations Prior to Check-in (Switch C1AUTH<5) (System-Wide Settings)
- Check the Allow Credit Card Authorizations Prior to Check-in box to allow the authorization of credit cards through VRP on future reservations. This should be checked by any customers who authorize guest credit cards for future reservations PRIOR to check-in. If VRP rejects the authorization, the property has the opportunity to ask for another form of payment at check-in. Additional amounts can be added to the authorization amount using Add to the Pre-Authorized Amount.
- Require Address Verification (416-59)
- Use Reservation Status on Arrival Date for Alternate Terminal ID
- This switch allows payments on future reservations where the arrival date equals the RDP system date to use the Alternate Terminal ID for credit cards. Alternate terminal ID can be used for properties that have a different Merchant number for advanced deposits. This also applies to payments made during check-in because the reservation is still future reservation at the time the payment is collected.
- Require card holder name on all non-swiped credit cards
- Do Not automatically release authorization at check-out
- Do Not use eComm MID for refunds of IRM payments
- Release authorization at check-out based on Folio I balance
- Automatically email credit card receipt when taking a payment
- Allow partial approvals
- If the requested amount is greater than what is available on the card being used, instead of failing the transaction, a charge is made for the available balance on the card. The user is then prompted to use another card to complete the requested amount.
Receipt Settings
- Number of Receipts to Print
- Thermal printers are usually set to 2, one copy for the property and one for the customer. Dot Matrix is set to one, because the copies are already in the roll.
- Secs. to Pause for Printer
- The program needs to pause for a few seconds to allow the printer to catch up after printing the receipt and before processing anymore code.
- Escape Code to Cut Paper
- Thermal printers do not have the ridge to rip the paper with, so the program needs to give it a code to tell it to cut the paper. Each printer has a different code, which is usually found in each printer's manual.
- Trailer Lines
- After the entire receipt is printed, the system prints as many blank lines as indicated in this field. That allows the receipt to advance a few lines before being cut and avoiding lines being cut off.
- Printer Common Name
- Use this field to enter the common name of the receipt printer when printing credit card receipts via terminal services. Enter the printer name up to 20 characters. If a printer name is entered in this field, the program searches through all installed printers for that user or session and finds the printer with that common name. Terminal services sessions often add a number to the printer for the session or order the user logged in. Therefore, the printer name cannot be found because of the extra character. For example, the printer name is Star for Star receipt printers, but the session adds a number to the end making it Star 3. By settings the common name, RDP will find the first printer with the name Star and use that as the receipt printer. If it does not find a printer with that common name, it will use the printer selected from the Printer drop down in the workstation settings section. If no printer is defined for that workstation, then the list of printer appears for the user to select which to print to.
- Print Receipt for Authorizations
- Some properties with do an Authorization Only at check-in. When checked, the system prints a receipt for the Authorization. Receipts are always printed when the credit card is actually charged (during sales and prior authorized sales).
- Do Not Print Merchant Number on Receipt
- When checked, the merchant number is not printed on the receipt. When unchecked, the merchant number in Field 1005 of the Protobase.OUT file is printed on the receipt.
- Always Prompt for Printer When Using Terminal Services
- With this box checked, a user that is logged into RDPWin using terminal services will always be prompted for the credit card receipt printer when processing credit cards. Some properties that use terminal services use a different station number each time the user logs in to the terminal server. The clerk will be prompted for the printer each they print a receipt. Properties that have a set station number for each login don't have to set this switch. Instead, select the Printer for the station specific settings at the top of the page.
- Use the Following Crystal Report for Receipt
- Check the box Use the Following Crystal Report for Receipts, in order to specify a Crystal Report as the credit card receipt. The Crystal Report can include a logo. If replacing the property name and address with the logo, uncheck the Print Company Name or blank out the applicable fields.
- The Crystal Report must have the parameter ReceiptText. This is required in order to pass Elavon's certification. RDP has included a standard report that can be modified called CreditCardReceipt, located in the RDP\Reports10\FrontDesk folder.
Transaction Descriptions
Configure the descriptions up to 40 characters in length for the six transaction types on an credit card receipt using the new Transaction Descriptions section of the Protobase Configuration screen. The descriptions are stored in Table C1.
| FIELD NAME | SWITCH |
|---|---|
| Authorization | C1SDCT1 |
| Sale | C1SDCT2 |
| Prior Authorized Sale | C1SDCT7 |
| Refund | C1SDCT9 |
| Void Sale | C1SDCT11 |
| Void Refund | C1SDCT17 |
RDPPay
- Use Encrypted SREDKey
- Enter the Serial Number of the device which is located on the bottom of the SREDKey device.
- View SREDKey section to determine if additional configuration is required on the credit card device
- Use Cloud EMV Device
- Generate Activation Code by following steps in the Ingenico Move/5000 section below first
- With the activation codes created, select the Configure Device option. This will display the RDPPay Portal. Select Terminal | Activate Terminal. Enter the Activation Code, description for the terminal, select the Merchant from the drop-down and click activate.
- After the activation of the terminal, select Terminals | View Terminals. Select the terminal from the list. Click Add Additional Merchant to Terminal. Enter a unique description, select the Merchant from the drop-down, click Add Merchant. Click the X to close the RDPPay Portal to return the credit card interface configuration screen. Select the Refresh Terminal List and select a terminal for each merchant Id.
Ingenico Move/5000
- Generate Activation Code
-
- Power on the device
- After the device has completed the boot sequence enter the following code: 2634
- The screen on the device should now display "Press F for menu" press the white key with the block dot (upper right button)
- Select the control panel, terminal settings, communication means, Wi-Fi, scan networks
- Select your network and enter the Wi-Fi password
- If everything was entered correctly, the Wi-Fi indicator will be green
- Reboot the device by pressing # and yellow key together or press the red key several times. An activation code will display.
- Complete terminal activation in RDPWin | System | Configuration | RDPPay | Use Cloud EMV Device | Configure Device
SREDKey
- Determine if the SREDKey 2 has been programmed to terminate with a carriage return
-
- Open Notepad and swipe a credit card into the SREDKey 2 device
- If the cursor is placed at the end of the entered text from the SREDKey 2 go to Step 4
- If the cursor is placed below the text entered, your device has already been configured to terminate with a carriage return and there are no additional actions.
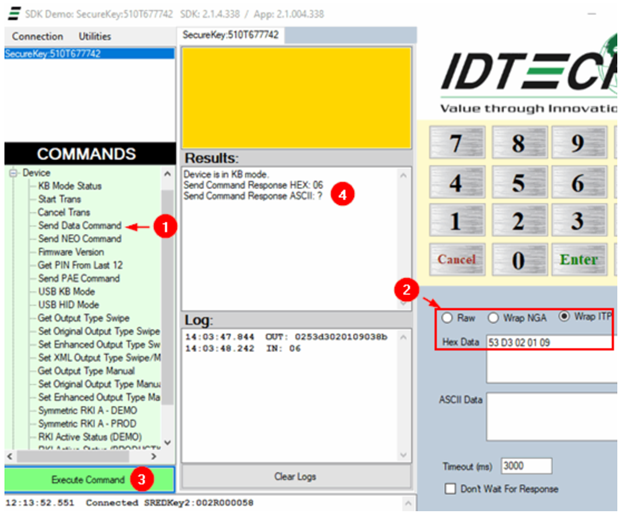
- Click here to download the latest ID Tech SDK Demo
- Run the setup.exe
- Windows | search | SDKDemo app
- Follow the below instructions to add 53 D3 02 01 0d. Be sure to use the provided value for the Hex Data and not what is in the screenshot
- After completing this process, you can use Notepad to confirm that the device was updated correctly
-
Testing
The user is now prompted for the zip code, name on the card, and if the card is present or not. Depending on the device used and the manner of entry the user may be prompted for all three pieces of information. An example of this is if a card is swiped using a SREDKey the user will be prompted for only the zip code. But if the card is manually entered using a SREDKey the user will be prompted for all three pieces of information.
GDS
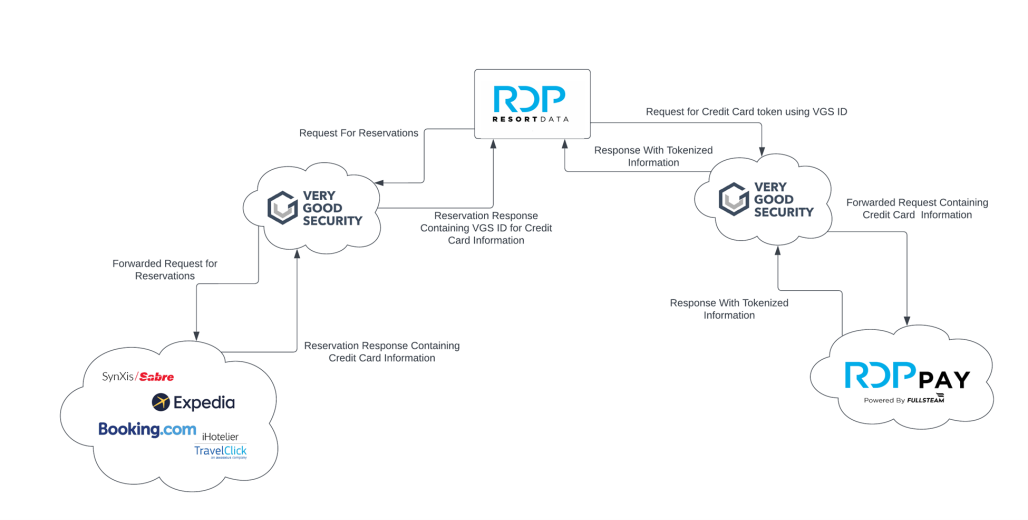
Starting with version 5.4 all GDS reservation requests will be passed through Very Good Security. This will only happen if the customer is not using either Tenerum or Shift4 for processing GDS requests. VGS acts as a proxy when requesting reservations from the GDS provided. When reservations are returned, the credit card information in the message is replaced with a VGS identifier. If the customer has RDPPay the system will then request a RDPPay token using the VGS identifier through the VGS proxy. While traveling through the proxy, VGS will replace the VGS identifier with the credit card data. RDPPay will receive the request tokenizing the card details and return a token response. If a customer does not have a credit card interface, the use of VGS is to protect the customer from receiving credit card data from the GDS providers.
More information about Very Good Security can be found here:
https://www.verygoodsecurity.com
NgSuite
Configuration
RDPPay for IRMng, OwnerNg, Self Check-In, Self Check-Out requires a CAPTCHA to prevent bot hits to the payment pages. NgSuite uses Google’s reCAPTCHA v2 to satisfy this requirement. Serial number 1000 demo files are pre-configured to use RDP’s reCAPTCHA keys, customers will need to obtain their own keys and enter them into RDPWin | System | Configuration | RDPPay Configuration. There is no charge from Google for up to 1,000,000 reCAPTCHA impressions per month.
-
- Create reCAPTCHA keys from https://google.com/recaptcha/admin.
- Choose ‘reCAPTCHA v2’
- Then choose ‘Invisible reCAPTCHA badge’
- Specify customer’s IRMng domain (for example: resortdata.com, secure.irm1.net, secure2.irm1.net)
- Specify owner’s email address, this should be the customer’s email
- Accept the terms of service
- Leave the ‘Send alerts to owners’ box checked
- Copy the Site Key and Secret Key into RDPWin | System | Configuration | RDPPay Configuration screen and Save
- ‘Invisible reCAPTCHA badge’ means that requests are validated in the background. A small reCAPTCHA widget does show in the lower right, but there is no checkbox. No action is normally required by the user. If Google flags the traffic as suspicious, the user will be prompted to solve a captcha (for example: click on pictures of taxis).
- ‘Send alerts to owners means’ that Google will send an email to this address if it detects problems with the site, such as a misconfiguration or an increase in suspicious traffic.
- Customers can return to https://google.com/recaptcha/admin and see metrics on total verifications, requests passed and failed, suspicious requests. Data is available for the last 7 or 90 days.
Mobile Check-In
Mobile Check-In uses a credit card terminal for processing authorizations and payments. A device must be configured for use with Mobile Check-In. First the device must be activated: from RDPWin choose System | Launch RDPPay Portal and click Login. From the choices on the left side, choose Terminals / Activate Terminal. Enter the Activation Code (will be displayed on the device), device Description and Merchant ID and click Activate. Second: from RDPWin / System / Configuration / Mobile choose from the device dropdown the terminal to use (the dropdown is populated with the descriptions of activated devices).
Feature Changes
A few payments related feature changes have been made to NgSuite products:
- CVV and billing zip code are always required with RDPPay. Switches and IRM configuration options regarding these are ignored.
- Owner referral reservations can no longer hide the payments fields until a deposit amount is entered. Either always take a credit card or never take a credit card for owner referral reservations. Charging a deposit is still optional. The combination that is no longer available is take a credit card only if a deposit is being charged.
- OwnerNg multi-owners or multi-contracts cases can no longer hide the payment fields until an amount is selected. The amount field will be disabled and populated when an amount is selected.
jQuery
RDPPay uses jQuery 3.3.1 (a popular JavaScript library) in its implementation. Some customers currently include jQuery in a custom.js file, usually for the implementation of clickable menu items in their custom html headers. Since IRMng and OwnerNg now include it, jQuery should be removed from custom JavaScript files. The author of the custom.js file should be able to do this. If that is not possible, RDPWest can assist.