Small group reservations can be made without the use of a group master. A group master is an account not a reservation, created on the B3 - City Ledger Group Billing that can be reused again and again for future stays. A leader is a reservation created to link the group reservations together or to be used as a billing folio. A leader typically is not an actual person, but rather a reservation in a non-rental LEADER room. The leader reservation will check-in and check-out, and will not be reused again in the future.
Use a group leader only if any of the following are needed:
- no statistical tracking
- less than 10 reservations are being made for the group
- billing will take place on the individual folios or group leader
Use a group master and leader if any of the following are needed:
- statistical tracking
- billing to be done after check-out
- default rate plan or market code required
- group block allocation
To Make Small Group Reservations with a Leader Only:
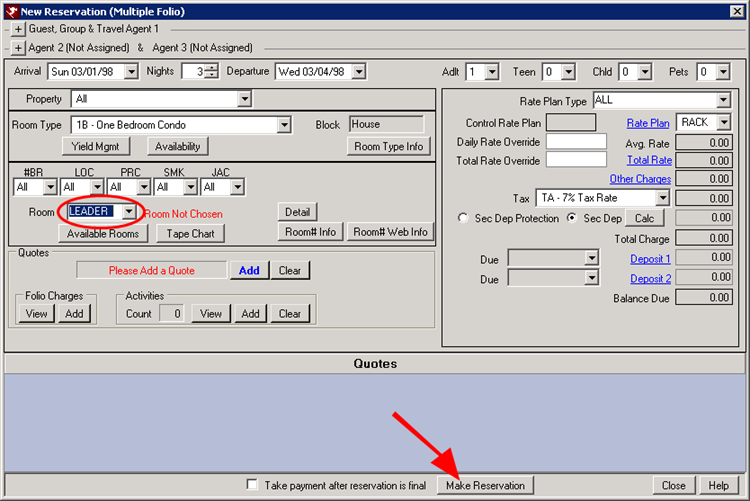
- In RDPWin, go to the Reservations main menu --> New Reservation --> Multiple Folio. This step will create the group leader reservation. Note: the group leader reservation will not be an actual person, but rather a non-rental reservation.
- Select the dates of group's stay by entering the Arrival and Departure.
- Select LEADER from the Room drop down right above the Available Rooms button.
- Click Make Reservation. Note: no rate plan or quote is needed for the leader reservation.
- When prompted if this Reservation is the Group Leader, select Yes.
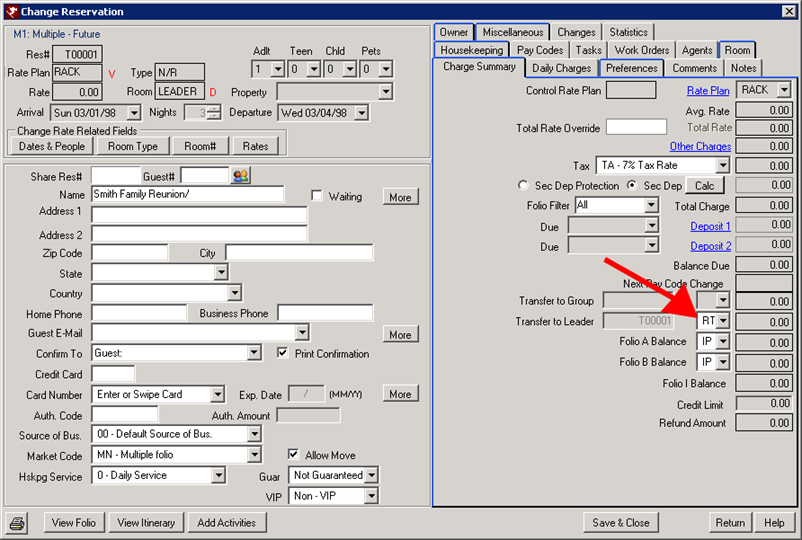
- Enter the group name and information. Best Practices: use the name of the group for the Group Leader Name. This makes it easy to identify when searching for the group. This should not be an actual person's name, as they can be entered as a reservation in a rental room.
- On the Charge Summary tab to the right of the reservation detail, select the correct pay code for the how the members will be billing the group leader in the Transfer to Leader field. If only a few members are allowed to bill the group, set the Pay Code to IP-Individual Pays and change only those reservations to the correct pay code after the group reservations are complete. By setting the pay code on the leader reservation, it will copy the information to the group reservations in the following steps.
- Save & Close.
- Once the leader reservation is completed, under the Options on the left side, click Add Rooms --> Add Multiple Rooms.
- Select the appropriate reservation type, Preassigned or Inventory. Preassigned with allow a room number to be assigned at the time of reservation, while a inventory will only assign a room type.
- The Arrival and Departure will default to the leader's reservation dates. Only change the dates if needed.
- Click the Select Rooms button if preassigning or click Select Room Types for inventory reservations.
- For preassigned reservations, check as many rooms needed for the group reservations. If using inventory, enter the number of rooms needed next to each room type.
- Change the rate plan if needed from the Rate Plan field and click the Calculate All Rates button. If overriding is the rates is necessary, click the Override All Rates button and enter the correct amount.
- Click the Reserve All button under "Step 4" on the screen.
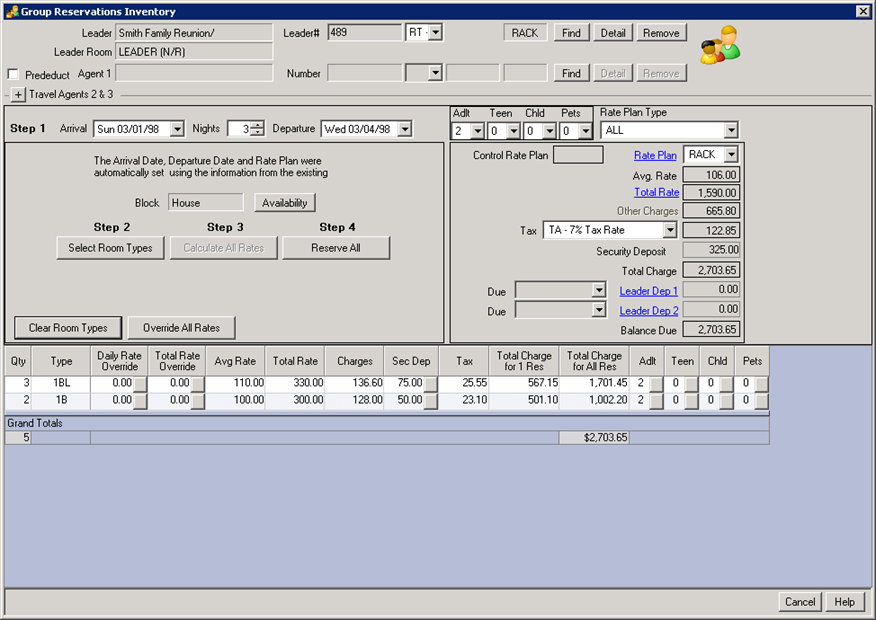
- Verify the information on the Group Reservation Information screen is correct before clicking Save & Close.
- Once the group reservations are completed, enter the individual guest's information on the applicable reservation.
Click these links for Frequently Asked Questions or Troubleshooting assistance.
Last Updated 02/24/2011
© 1983-2011 Resort Data Processing, Inc. All rights reserved.