How To Check-In Reservations:
- In RDPWin, click the F6 Arrivals button or hit the F6 key on the keyboard; or to find a reservation click the F3 Find Res button or hit the F3 key on the keyboard.
- If using the F6 Arrivals list, locate and select the reservation that will be checked in. If the using the F3 Find, enter the guest's last name or reservation number in the Guest Name or Reservation Number field.

- Once the reservation has been selected by single clicking to highlight, click Check-In from the Options on the left hand side. Note: double clicking the reservation will open it in the Change Reservation screen and check-in is not allowed.
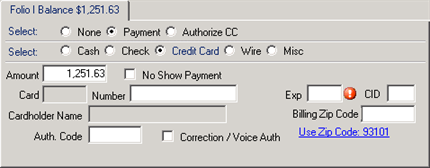
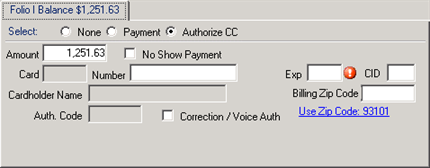
- Determine if payment will be collected or if the credit card will authorized. If collecting payment, click the Payment radio button. If authorizing the card, click the Authorize CC radio button. Select None if no payment or credit card authorization is needed.

- If collecting payment, determine the method of payment by selecting the radio button for Cash, Check, Credit Card, Wire or Misc. Enter the amount collected if different from the default amount. If taking a credit card payment, place the cursor in the Number field and either swipe or key in the credit card number and expiration date. Enter the CID from the back of the card. Enter the Billing Zip Code or click the link Use Zip Code: xxxxx. Click Process Payment.
- If authorizing a credit card, enter the authorization amount if different than the default amount. Place the cursor in the Number field and either swipe or key in the credit card number and expiration date. Enter the CID from the back of the card. Enter the Billing Zip Code or click the link Use Zip Code: xxxxx. Click Authorize Card.
- Optional Steps- Follow these steps only when necessary:
- To change or assign a room, click the Change Room button. Select the appropriate room.
- To print a registration card, click the Print Reg Card button.
- To view reservation comments, click the Comments button. Note: these comments are read-only and cannot be changed from this screen.
- To view any guest history information, click the Guest History button. Note: this screen is read-only.

- Click the Check -In button to check in the reservation.
Click these links for Frequently Asked Questions or Troubleshooting assistance.
Last Updated 02/01/2011