The following instructions outline how to add or change system messages that appear on the main screen when users first log into RDPWin. These messages can be used to post information about a new rate or package being offered, a list of phone numbers, information about a group arriving, etc.
There are two types of messages that can display at logon. System Messages and Logon Messages. System messages display for all users, while Logon Messages display for the individual user or user group that is logging in. For Logon Messages, the system for list looks for the individual user logon message and if not found, it will look for the user group logon. User groups are assigned from the Manage Users program for each logon.
Add System Messages:
- Create the message document using Microsoft Word or Wordpad.
- Click File --> Save.
- Change the location of the file by clicking the Save In drop down. Select the RDPNT drive (usually r:\ or f:\ drive) --> select the RDP folder --> select the Messages folder.
- Enter the file name using "System" as the prefix of the file name. For example, SystemWelcome or SystemIntro.
- In the Save as Type drop down, change the file to Rich Text Format (RTF) --> click Save.
- Close the document.
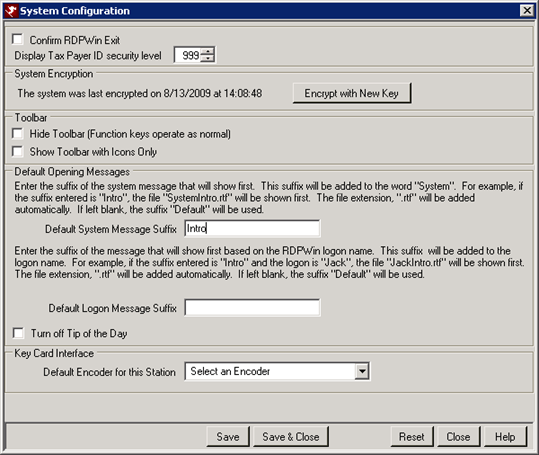
- In RDPWin, go to the System main menu --> Configuration --> System.
- In the Default System Messages Suffix field, enter the file name suffix created in step 4. For example, if the file created was SystemWelcome, enter Welcome in the field. Do not enter the System, RDP recognizes the System prefix.
- Save & Close.
- Click Start --> Home, to view the newly created message.
Change System Messages:
- Locate the file name being used for the system message in RDPWin by going to the System main menu --> Configuration --> System.
- Note the name in the Default System Message Suffix field.
- Open Microsoft Word or Wordpad.
- File --> Open.
- Browse to the RDPNT folder located on a mapped drive (usually r:\ or f:\).
- Open the RDP folder --> open the Message folder.
- Select the file name noted from step 2. The file starts with "System."
- Make the necessary changes to the file and save.
- Close the document and click Start --> Home, in RDPWin to see the changes.
Add Logon Messages:
- Create the message document using Microsoft Word or Wordpad.
- Click File --> Save.
- Change the location of the file by clicking the Save In drop down. Select the RDPNT drive (usually r:\ or f:\ drive) --> select the RDP folder --> select the Messages folder.
- Enter the file name using the user logon name or user group as the prefix of the file name followed by the message name. For example, if the message is for Jack, the suffix is ToDoList, the file name would be "JackToDoList." If creating the file for the user group attached to the user in the Manage User program, no spaces are allowed in the file name. For example, if the file is for the Front Desk group, the file name is "FrontDeskToDoList."
- In the Save as Type drop down, change the file to Rich Text Format (RTF) --> click Save.
- Close the document.
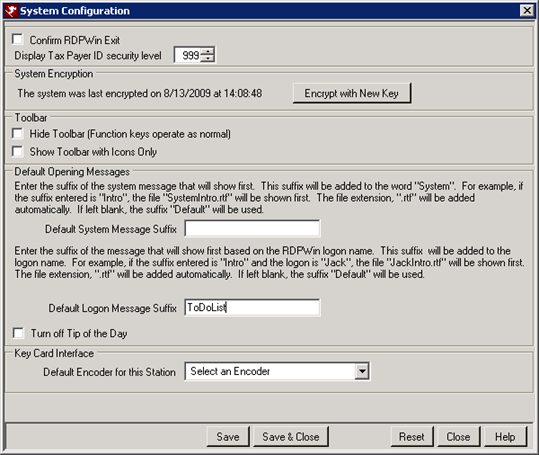
- In RDPWin, go to the System main menu --> Configuration --> System.
- In the Default Logon Messages Suffix field, enter the file name suffix created in step 4. For example, if the file created was JackToDoList, enter ToDoList in the field. Do not enter the user name or user group, as RDP recognizes that automatically as the prefix.
- Save & Close.
- Click Start --> Home, to view the newly created message.
Change Logon Messages
- Locate the file name being used for the logon message in RDPWin by going to the System main menu --> Configuration --> System.
- Note the name in the Default Logon Message Suffix field.
- Open Microsoft Word or Wordpad.
- File --> Open.
- Browse to the RDPNT folder located on a mapped drive (usually r:\ or f:\).
- Open the RDP folder --> open the Message folder.
- Select the file name noted from step 2. The file starts with user logon or user group.
- Make the necessary changes to the file and save.
- Close the document and click Start --> Home, in RDPWin to see the changes.
Click these links for Frequently Asked Questions or Troubleshooting assistance.
Last Updated 03/19/2012