System
RDPWin Help File Not Displayed
Overview
When viewing the RDPWin help file, the help file pane may have either of the following messages:
Action Cancelled
Not Allowed - Security
This error is caused by a security update from Microsoft. The error only occurs on systems accessing the RDPWin help file on a network drive. This error does not occur if the help file is on the workstation. See the Microsoft knowledge base article 896054. There are 2 possible solutions listed below.
Solution 1
-
Click here to download CHMHelpFileFix.reg
-
Save this file in the RDP root folder
-
From each workstation, double click on this file and confirm the change to the registry
-
Restart RDPWin and the help file should display correctly
-
Right click on Windows Start, click Run, type regedit, click OK
-
Locate and then click the following subkey: HKEY_LOCAL_MACHINE\SOFTWARE\Microsoft\HTMLHelp\1.x\ItssRestrictions
-
Right click the MaxAllowedZon value, and then click Modify
-
In the Value data box, type 3 and then OK
-
Quit Registry Editor
-
Restart RDPWin and the help file should display correctly
If the steps above does not fix the problem continue with the additional steps below
Solution 2
-
Click here to download HHReg.exe
-
Run the program
-
Click the General Security tab
-
Change the drop down to 2=Trusted Zone Sites
-
Open Internet Explorer
-
Tools | Internet Options | Security tab
-
Click Local Intranet
-
Click Sites
-
Click Advanced
-
Enter file :\\dataservername, and click Add
-
Click Close | OK | OK
-
Close RDPWin completely, log back in and the help file should display correctly
Webex End of Support for Windows 7 and 8
From Webex: On January 31st, 2022, we will officially end of life support of the Webex app on these operating systems.
In the October 2021 (41.10) release, Windows 7.x, 8.x and MacOS 10.12 operating systems will reach end of support. The minimum requirement for the Webex app will be Windows 10 and MacOS 10.13. Users running on Windows 7.x, 8.x or MacOS 10.12 operating systems will no longer receive new releases or features after the October release.
Additionally, we will no longer provide bug fixes or updates for these releases. To have the best experience possible, plan to upgrade your operating system before October 2021. See our system requirements help article.
For more information, review the article at https://help.webex.com/en-us/article/njrv0t2/Webex-End-of-Support-for-Windows-7-and-8-and-MacOS-10.12#Cisco_Reference.dita_d0ee5e0f-6d15-4a43-a6e5-a3069b90ed68
RDPWin Monitor
If confirmation are not being sent
- Go to RDPWin Monitor -> Monitor Reservations and confirm the Status of the service is “Running”. If it is not running, click the Start RDPWin Monitor button and make sure it starts correctly. If all reservations have a status of “Not Processed”, then the RDPWinPath.txt file is most likely not correct. See Step 3 below.
- Select Configuration from the System | RDPWin Monitor submenu. Confirm that the appropriate reservation sources (RDPWin, RDPDOS, IRM, GDS) and directories (any available property codes) are checked.
- To make sure the service always starts when the server is re-booted,
do the following from the data server console:
- Start -> Programs -> Administrative Tools -> Services
- Right click on the RDPWin Monitor service and choose Properties
- Make sure the startup type is “Automatic”. Note: To disable the service if not used, change the setting in Step 3
- Click the Start button if the button is not disabled.
- Go to RDPWin Monitor -> Monitor Reservations and click Stop RDPWin Monitor. View the log information at the bottom of the screen. There should be an entry stating: RDPMonitor service stopped. If there is no entry in the Error Log area, check the RDPWinPath.txt file in c:\ProgramFiles\ResortDataProcessing\RDPWin folder on the data server to make sure it exists and that the path in the file correctly points to the RDP data folder.
- In the RDPWin Monitor, right-click any reservation on the list and choose Send E-Mail Confirmation. This forces an e-mail to be sent which will test the confirmation and SMTP configuration found under Reporter -> Configuration. Make sure there are no errors or fix the errors that occur.
Incorrect Display of Columns/Rows
- Should any grids appear to not be displaying correctly, right-click and select Reset Grid Layout before calling support. This function returns the current grid to its default settings and abandons any column width, filters, or group settings saved. This is only available when the grid information is being saved, and it returns the entire grid to its default settings. Use with caution. (Not available in Work Orders & Asset Management/Vendors.)
Error: mnuResReports-BuildSubMenuSQL: Exception: Infragistics.Shared.KeyedSubObjectsCollectionBase.ValidateKeyDoesNotExist - Key already exists
Issue: After an RDPWin update, users receive the above error when clicking F6, F7, F8, F9. Users will also see a report folder appear twice in the Report Navigation area.
Resolution:
-
Log all users out of RDP
-
Reporter | Configuration | General tab
-
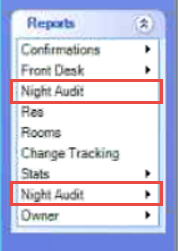
Remove Night Audit from the Reservations Navigation Area
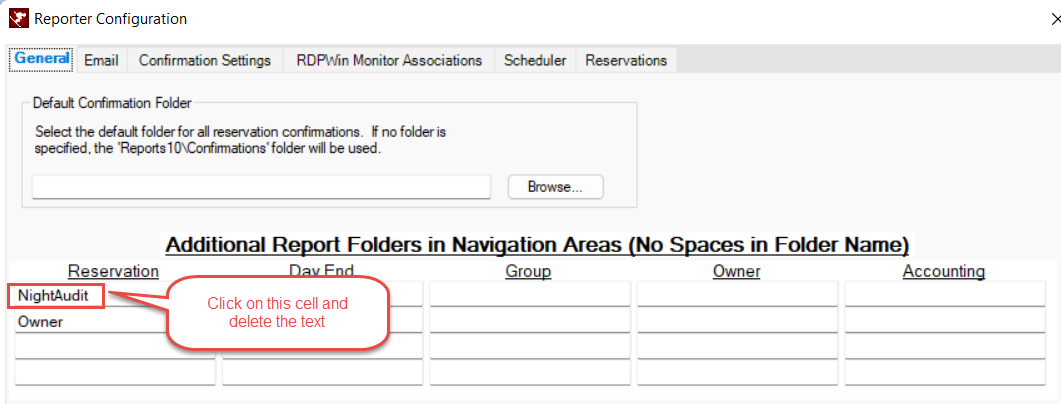
-
Save & Close
-
Log out and then log in of RDPWin
Full error message:
mnuResReports-BuildSubMenuSQL: Exception: Infragistics.Shared.KeyedSubObjectsCollectionBase.ValidateKeyDoesNotExist - Key already exists
Parameter name: Key
Error
Line# 361 - Infragistics.Shared.KeyedSubObjectsCollectionBase.ValidateKeyDoesNotExist
Call Stack
Line# 415 - RDPWin.RDPReportsMenu.BuildSubMenuSQL
Line# 327 - RDPWin.RDPReportsMenu.AddReportItem
Line# 127 - RDPWin.RDPReportsMenu.Bind
Line# 21 - RDPWin.ResXpander.Bind
Line# 27 - RDPWin.ResMain.InitControls
Line# 10 - RDPWin.ResMain..ctor
Line# 1378 - RDPWin.Main.LoadMainPanel
Line# 1714 - RDPWin.Main.ExecuteButton
Line# 1601 - RDPWin.Main.ucRdpMainMenu_ToolBarItemSelected
Line# 651 - RDPWin.RDPMainMenu.utmRDPMenu_ToolClick
Line# 83 - RDPWin.My.MyApplication.Main
Create File Version
RDPWin checks the Pervasive Server engine for the "Create File Version" setting. If this setting is lower than version 7.x, RDPWin will not start and a message with instructions to change this setting is displayed. To check or change this setting:
- From the data server console, start Pervasive Control Center.
- Expand the "Pervasive.SQL Engines" node.
- Expand the computer name.
- Expand "Configuration "
- Expand "Settings"
- Click on the "Compatibility" folder.
- View the "Create File Version" to make sure it is 7.x or 8.x.
- To change, double-click on the setting and choose the highest version from the drop down list.
- RDPWin also checks for the Communication Buffer Size Settings and will issue a message if this setting is too small.
- Restart the Pervasive services so the change takes effect. To do this, Make sure all RDP systems are exited from the system. This inlcudes RDP-DOS, RDPWin, IRM and all interface computers. Right click on the computer name, highlight "Tasks" and choose "Restart Pervasive Services".